Transitioning to Neomutt and friends for e-mail
I'm constantly seeking out applications that provide Vim like keyboard bindings---it ensures that I have one set of keys that does the same thing everywhere, and so, it saves me from having to:
- remember different hot keys for different applications
- leave the home row to use the mouse/touchpad (Yeh, the home row is a thing!)
So, I now use the excellent byobu where I run:
- ncmpcpp for music: it provides Vim like key bindings.
- Vifm for file management, although, a command line is usually sufficient.
- Vit as a Taskwarrior terminal based front-end, which, yep, provides Vim like key-bindings.
- Weechat for IRC which also has Vim bindings.
Vim has an in-built file browser, and one can use other plug-ins such as NerdTree for more advanced tasks. I even have a Taskwarrior plug-in for Vim that let's me quickly look up my tasks while writing code and the sort.
For other uses where the terminal is insufficient, I've found:
- Vimiv for viewing images
- Qutebrowser as a full featured browser. One can also use add-ons to Firefox/Chrome, but I've quite fallen for Qutebrowser.
- Zathura for viewing various document types.
I rarely use LibreOffice---I mostly stick to LaTeX, and Vim deals with it rather well.
In all of the above mentioned applications, hjkl moves about, other hot
keys such as G and gg, and so on work too, and they even have a
command mode that can be accessed using : as in Vim. So, I don't have
to think of the shortcuts now---it's all muscle memory!
Evolution, being a modern GUI productivity tool, does not have a method to navigate around only using a keyboard, and this got me to look for an e-mail client that provided Vim like bindings. The answer I found was the rather well known mutt terminal client. I'd been thinking of giving it a go for a while now---more than a year. However, as I document later in this post, setting up mutt isn't as trivial as setting up Evolution where one simply uses Gnome Online Accounts and can get up and running in a few minutes.
At no point will I suggest that anyone migrate to such a terminal oriented setup. This is tailored to my personal, rather Vim-y needs. One should use whatever tools fit their personal tastes. We needn't spend time on "But, I prefer this, and it's better!" themed conversations.
Please note that everything that is documented here is for an up to date Fedora 27 system. Most steps should be general enough to work on other distributions. One will have to go find the right packages, though. I followed this guide as the main source of information, and the looked around when I needed some more info. I've collected a list of links at the bottom of this post.
E-mail: the details
When a majority of us use e-mail, we simply interact with a client. These clients: Evolution/Thunderbird/Outlook or the web applications that we access, keep the nitty-gritty details away from end users. The wikipedia article on e-mail explains the process quite well:
- An MUA (mail user agent) is the client that we use to read/write email.
- The MUA interacts with an MSA (mail submission agent) to send e-mail, or an MDA (mail delivery agent) to receive e-mail to and fro a mailbox.
mutt is an MUA, so we need to set up the other bits for it to be able to interact with an MSA and an MDA, and that's why it is a little more work than setting up Evolution and so on where the tool takes care of setting up the whole chain.
Fetch e-mail with Offlineimap
There are a few tools that fetch e-mail. Offlineimap seemed to be widely used, so I settled for it as well. On Fedora, one can use DNF:
sudo dnf install offlineimap
One must then set up their accounts with credentials and the sort. An example
config file is provided with the package at
/usr/share/doc/offlineimap/offlineimap.conf
The config format is quite self explanatory. Here's an example:
[general]
accounts = account1

[Account account1]
localrepository = account1-local
remoterepository = account1-remote
status_backend = sqlite
postsynchook = notmuch new

[Repository account1-remote]
type = IMAP
remotehost = mailhost.com
remoteport = 587
remoteuser = username@mailhost.com
remotepass = password
ssl = no
folderfilter = lambda foldername: foldername in ['INBOX', 'Sent', 'Spam', 'Trash', 'Drafts']
createfolders = False
maxconnections = 2

[Repository account1-local]
type = Maildir
localfolders = ~/Mail
restoreatime = no
There's a "general" section where one defines what accounts are to be used. One can also define global options that will apply to all accounts here.
For each account, one then sets up the main configurations, and then set up the
remote and local repositories. There are other advanced options that one can
use too. The folderfilter, for example, is a python statement that lets
one select what folders on the remote should by synced. More in the offlineimap
documentation.
The postsynchook bit lets one run a command after Offlineimap has
finished syncing. Here, it calls notmuch to update its database. More on
notmuch later.
Once configured, one can run Offlineimap to fetch one's mail. The first sync will take quite a while, but subsequent syncs will be much quicker.
offlineimap
I set up a cronjob to sync my e-mail regularly. Most users also use a script that kills previously running Offlineimap instances that may have hung, so a script like this may be more useful:
check ()
{
    while pkill offlineimap
    do
        sleep 2
    done
}

quick ()
{
    offlineimap -u quiet -q -s
}

full ()
{
    offlineimap -u quiet -s
}

# parse options
while getopts "qf" OPTION
do
    case $OPTION in
        q)
            check
            quick
            exit 0
            ;;
        f)
            check
            full
            exit 0
            ;;
        ?)
            echo "Nothing to do."
            exit 1
            ;;
    esac
done
My crontab then looks like this:
*/20 * * * * /home/asinha/bin/fetch-mail.sh -q
10 */8 * * * /home/asinha/bin/fetch-mail.sh -f
So, every 20 minutes, I do a quick sync, and once every 8 hours, I do a full sync.
Sending e-mail with msmtp
Now that we can fetch our e-mail, we look at sending e-mail. sendmail is quite a well known client, but the setup is a bit cludgy for me. msmtp was recommended by quite a few users. On Fedora, one can install it using DNF:
sudo dnf install msmtp
The configuration for msmtp is quite simple too. The package provides two example configuration files:
/usr/share/doc/msmtp/msmtprc-system.example
/usr/share/doc/msmtp/msmtprc-user.example
Here's an example:
defaults
protocol smtp
auth on
tls on
tls_trust_file /etc/ssl/certs/ca-bundle.crt
syslog LOG_USER
logfile ~/.msmtp.log
timeout 60

account account1
host smtp.hostname.com
port 587
domain hostname.com
from something@hostname.com
user username@hostname.com
password password

account account2
host smtp.anotherhostname.com
port 587
domain anotherhostname.com
from something@anotherhostname.com
user username@anotherhostname.com
password password
It has a default section where options common to all accounts can be set up. here it does to usual setup regarding TLS, and so on.
A separate section for each account then holds the credentials. One can then send e-mail from the command line:
echo "Subject: Test" | msmtp -a account1 someone@anotherhost.com
Setting up the MUA: (neo)mutt
The two MTAs are now set up, and we can fetch and send mail. We can now link these up to our MUA, mutt. Instead of mutt, I use neomutt which is mutt with additional patches and features. It isn't in the Fedora repos yet, but there's a COPR repository set up for users:
sudo dnf copr enable flatcap/neomutt
sudo dnf install neomutt
The neomutt configuration is based on the mutt bits, and it's rather extensive. The package provides an example that I use as a starting point:
/usr/share/doc/offlineimap/offlineimap.conf
The important bits are here:
mailboxes ="account1"
mailboxes `find ~/Mail/account1/* -maxdepth 0 -type d | grep -v "tmp\|new\|cur" | sed 's|/home/asinha/Mail/|=\"|g' | sed 's|$|\"|g' | tr '\n' ' '`
set from = "user@hostname.com"
set use_from = "yes"
set reply_to = "yes"
set sendmail = "msmtp -a account1"
set sendmail_wait = 0
set mbox = "+account1/INBOX"
set postponed = "+account1/Drafts"
set record = "+account1/Sent"
The mailboxes list what folders the sidebar in neomutt. These are what
we've set up offlineimap to fetch for us. Similarly, the sendmail
setting tells neomutt to use msmtp to send e-mail.
If it all went well, running neomutt should bring up a window like the
figure below:
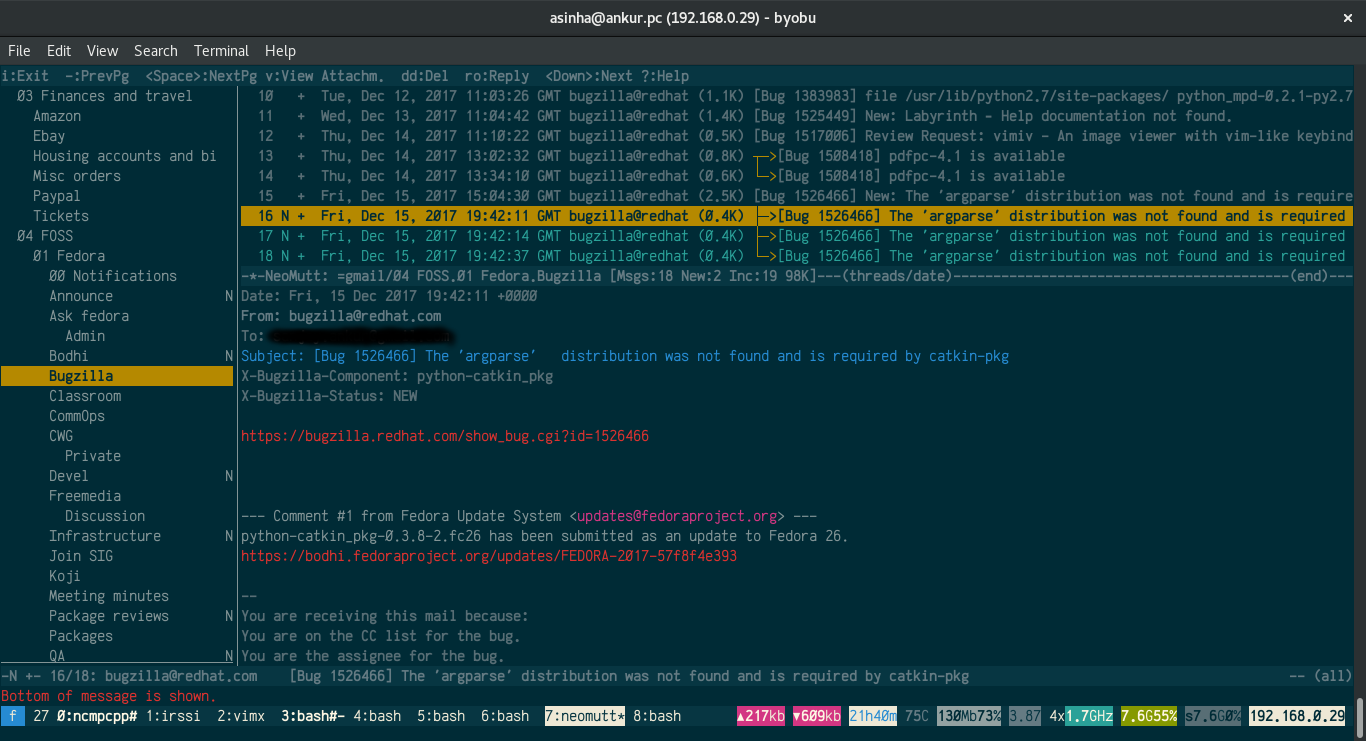
On the left, there's the sidebar where all folders are listed. These can be
configured using mailboxes as explained in the documentation here. On the right hand side, the
various e-mails are listed on top in the index, and a particular e-mail
is visible in the pager view. As can be seen, the index view also shows
threads! (This is running in byobu, by the way, which shows the other
information in the bottom information bar.) More on all of this in the
documentation, of course.
Searching e-mail with notmuch
We have our e-mail set up, but we at the moment, it has a very basic search
feature that mutt provides. notmuch, which thinks "not much mail" of your
massive e-mail collection helps here. notmuch is called after each Offlineimap
sync above, in the postsynchook. Then, using simple keyboard shortcuts,
one can use notmuch search their whole e-mail database. notmuch has quite a
few advanced features, like searching as threads, and searching e-mail
addresses, and the sort. notmuch comes with the handy notmuch-config
which makes configuration trivial. Here's an example below:
$ notmuch address from:*lists.fedoraproject.org
classroom-request@lists.fedoraproject.org
freemedia-owner@lists.fedoraproject.org
fedora-join-bounces@lists.fedoraproject.org
fedora-join-owner@lists.fedoraproject.org
cwg-request@lists.fedoraproject.org
cwg-private-request@lists.fedoraproject.org
The same can be used within neomutt with a few simple hotkeys:
macro index <F8> \
"<enter-command>set my_old_pipe_decode=\$pipe_decode my_old_wait_key=\$wait_key nopipe_decode nowait_key<enter>\
<shell-escape>notmuch-mutt -r --prompt search<enter>\
<change-folder-readonly>`echo ${XDG_CACHE_HOME:-$HOME/.cache}/notmuch/mutt/results`<enter>\
<enter-command>set pipe_decode=\$my_old_pipe_decode wait_key=\$my_old_wait_key<enter>" \
 "notmuch: search mail"

macro index <F9> \
"<enter-command>set my_old_pipe_decode=\$pipe_decode my_old_wait_key=\$wait_key nopipe_decode nowait_key<enter>\
<pipe-message>notmuch-mutt -r thread<enter>\
<change-folder-readonly>`echo ${XDG_CACHE_HOME:-$HOME/.cache}/notmuch/mutt/results`<enter>\
<enter-command>set pipe_decode=\$my_old_pipe_decode wait_key=\$my_old_wait_key<enter>" \
 "notmuch: reconstruct thread"

macro index <F6> \
"<enter-command>set my_old_pipe_decode=\$pipe_decode my_old_wait_key=\$wait_key nopipe_decode nowait_key<enter>\
<pipe-message>notmuch-mutt tag -- -inbox<enter>\
<enter-command>set pipe_decode=\$my_old_pipe_decode wait_key=\$my_old_wait_key<enter>" \
 "notmuch: remove message from inbox"
The three commands in a neomuttrc file will respectively:
Other tweaks
The aforementioned bits cover most of the main functions that one would need with e-mail. Here are some more tips that I found helpful.
I have not yet set up a command line address book client. There seem to be a few that sync with Gmail and other providers and can be used with mutt, but I don't need them yet. notmuch provides sufficient completion for the time being, and when I begin to use newer addresses that are not already in my mailbox, I shall look at address book clients. For those that are interested, these are what I've found:
Storing passwords using pass
Storing passwords as plain text is a terrible idea. Instead most use password managers. pass is an excellent command line password manager that uses GPG to encrypt password files. It even integrates with Git so that a central repository can hold the encrypted files, and can be cloned to various systems.
Both Offlineimap and msmtp permit a user to store passwords in a tool and then
run a command to extract it. In the offlineimaprc, for example, one can
use:
remotepasseval = get_pass("E-mail")
to fetch passwords from pass. Here get_pass is a python function that
does the dirty work:
def get_pass(account):
        return (check_output("pass " + account, shell=True).splitlines()[0]).decode("utf-8")
Similarly, msmtp lets one use a shell command to get a password:
passwordeval pass E-mail
where the E-mail file is associated with the password for a certain account using pass.
Multiple accounts
Both Offlineimap and msmtp can handle multiple accounts. neomutt can too,
but to set sane defaults each time one switches mailboxes, a bit of trickery is
required. The gist here shows
what's needed. Essentially, using a folder-hook, one updates the
required configurations (signature, from address, sent mail folder, draft
folder) when one switches to a folder associated with a different account. I
use four accounts in neomutt currently. It works rather well. The snippet
below is what I have in my neomutt configuration file. It sets up host3 as the
default account, and each time I change to a different host folder, the
folder-hook updates some configurations. Here, I have different files for each
host.
# Hooks for multi-setup
# default
set folder ="~/Mail"
set spoolfile = "+host3/INBOX"
source ~/Documents/100_dotfiles/mail/host1.neomuttrc
source ~/Documents/100_dotfiles/mail/host4.neomuttrc
source ~/Documents/100_dotfiles/mail/host2.neomuttrc
source ~/Documents/100_dotfiles/mail/host3.neomuttrc

# folder hook
folder-hook host4/* source ~/Documents/100_dotfiles/mail/host4.neomuttrc
folder-hook host1/* source ~/Documents/100_dotfiles/mail/host1.neomuttrc
folder-hook host2/* source ~/Documents/100_dotfiles/mail/host2.neomuttrc
folder-hook host3/* source ~/Documents/100_dotfiles/mail/host3.neomuttrc
GPG signing
I sign my e-mails with my GPG key. neomutt supports this via a few configuration options:
set pgp_sign_as = 0xE629112D
set crypt_autosign = "yes"
set crypt_verify_sig = "yes"
set crypt_replysign = "yes"
E-mails will be signed when they're going out, and when a signed e-mail comes in, neomutt will verify the signature if the key is available and so on. If you're not using GPG keys, this guide on the Fedora wiki is a great guide for beginners.
Viewing HTML mail and attachments
Even though I send all my e-mail as plain text, I do receive lots of HTML mail.
neomutt can be set up to automatically view HTML e-mail. It does so by using a
tool such as w3m to strip the e-mail of HTML tags and show the text.
The screenshot below shows an example HTML from Quora.
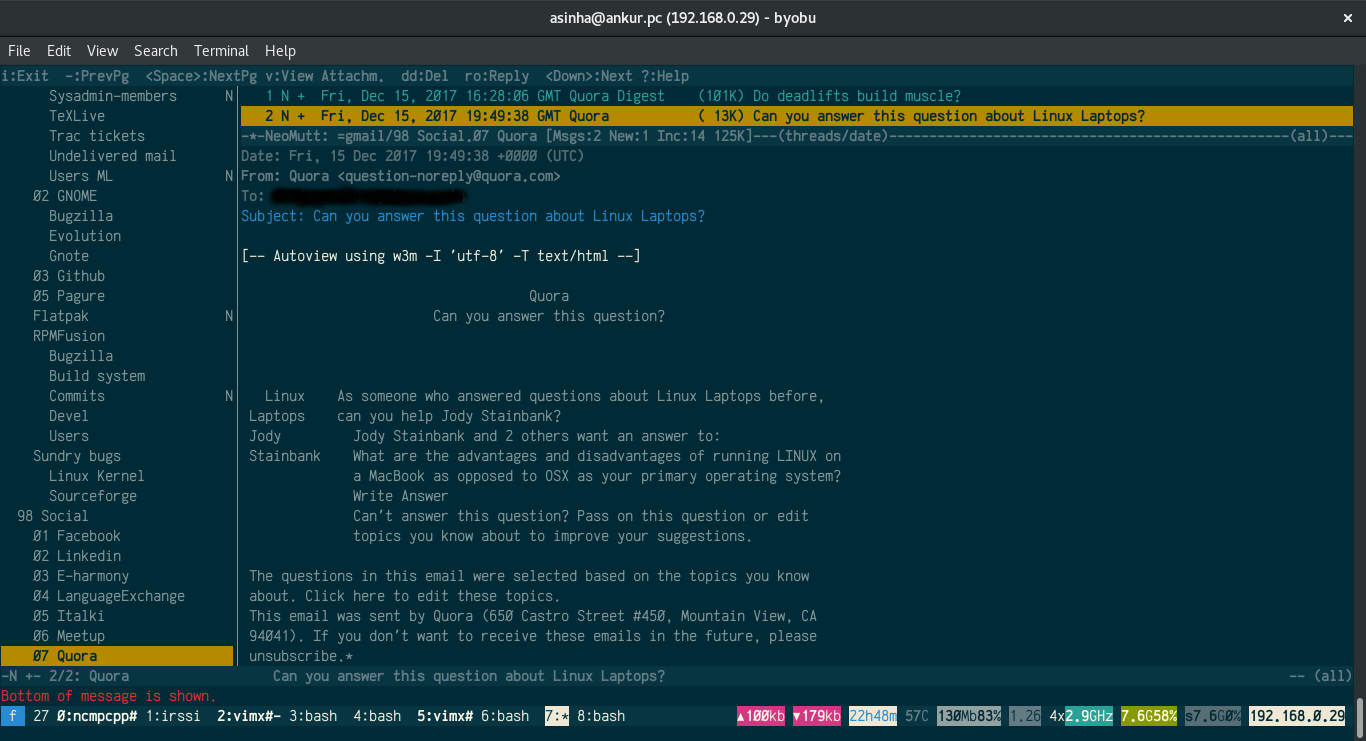
A simple configuration line tells neomutt what to do:
auto_view text/html
neomutt uses information from mailcap to do this. For those that are
unaware of what mailcap is, like I was, here's the manual page.
The configuration file for mailcap is ~/.mailcaprc. Mine looks
like this:
audio/*; /usr/bin/xdg-open %s ; copiousoutput

image/*; /usr/bin/xdg-open %s ; copiousoutput

application/msword; /usr/bin/xdg-open %s ; copiousoutput
application/pdf; /usr/bin/xdg-open %s ; copiousoutput
application/postscript ; /usr/bin/xdg-open %s ; copiousoutput

text/html; qutebrowser %s && sleep 5 ; test=test -n "$DISPLAY";
nametemplate=%s.html; needsterminal
# text/html; lynx -dump %s ; copiousoutput; nametemplate=%s.html
text/html; w3m -I %{charset} -T text/html ; copiousoutput; nametemplate=%s.html
One can use either lynx or w3m. I tried both and settled for
w3m. Fedora systems have a default mailcaprc file at
/etc/mailcap which I adapted from. The copiousoutput option
tells neomutt not to quickly delete the temporary file.
For cases where HTML e-mails also contain images, one can simply open the HTML
e-mail in a browser. The HTML e-mails are present as attachements to the e-mail
message. Pressing v on an e-mail message shows the attachement menu.
The screenshot below shows the attachment menu for the same e-mail as above.
Hitting enter opens up the HTML attached version in the browser I've set up in
my mailcap above, qutebrowser.
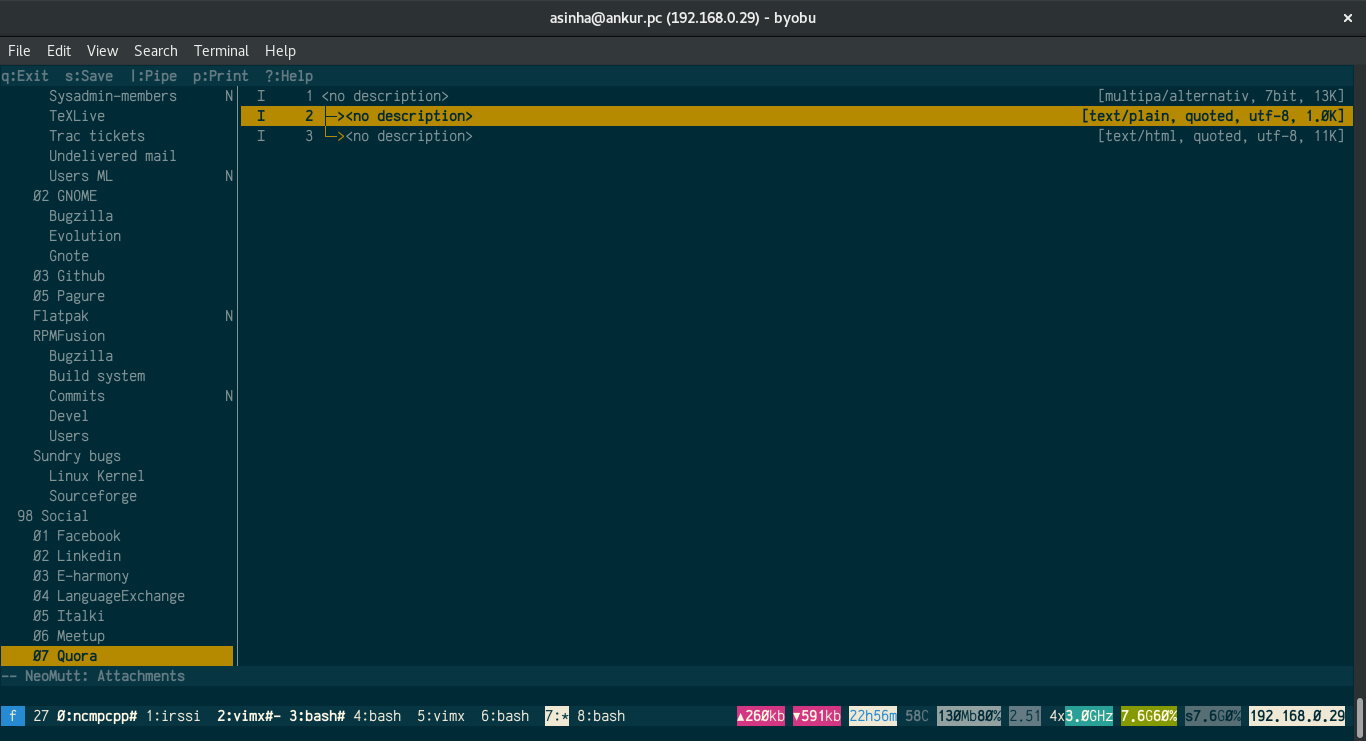
Note: all attachments can be viewed like this.
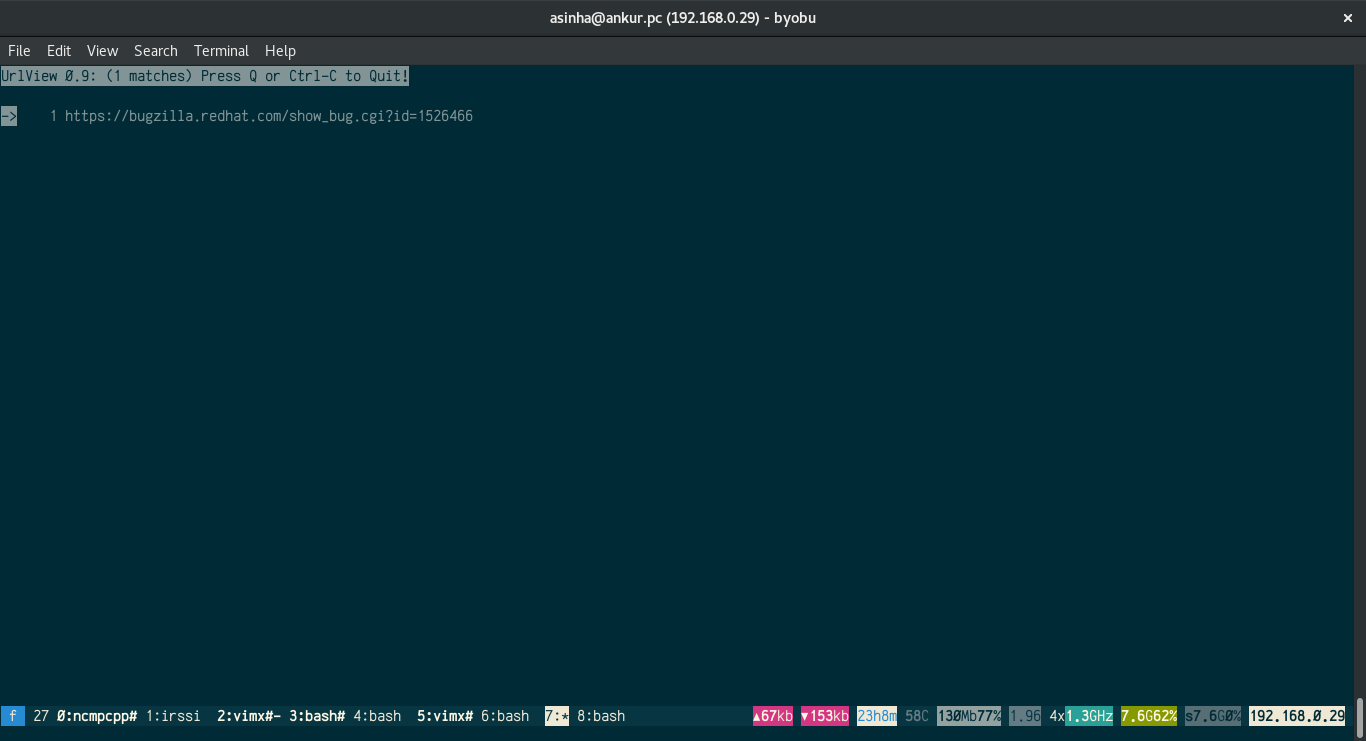
Viewing links with urlview
Since I use byobu, which is based on either tmux or screen, I can copy and paste any text in the terminal using their buffers. neomutt provides an easier way, though, using urlview. So, binding ctrl-b to urlview will put the e-mail through urlview to show a menu of all URLs in it. One can then pick what URL to open, as the screenshot below shows:
# urlview bits
macro index \cb | urlview\n
macro pager \cb | urlview\n
Right then, let's stick to the home row!
This post turned out to be a lot lengthier than I'd expected. There's always so much tweaking one can do. I hope this helps somewhat. It isn't complete by a far stretch, but it should include enough hints and links to enable a reader to Google up and figure things out. Read the docs, read the manuals---it's all in there.
Happy e-mailing!
Incomplete list of references
Here are most of the links I looked at, in no particular order:
- https://hobo.house/2015/09/09/take-control-of-your-email-with-mutt-offlineimap-notmuch/
- https://github.com/sadsfae/misc-dotfiles/blob/master/muttrc-gpg.txt
- http://upsilon.cc/~zack/blog/posts/2011/01/how_to_use_Notmuch_with_Mutt/
- https://notmuchmail.org/
- https://git.notmuchmail.org/git/notmuch/blob/HEAD:/vim/README
- https://www.neomutt.org/guide/optionalfeatures
- https://wiki.archlinux.org/index.php/OfflineIMAP#Using_pass
- http://www.df7cb.de/blog/2010/Using_multiple_IMAP_accounts_with_Mutt.html
- https://github.com/OfflineIMAP/offlineimap/blob/master/offlineimap.conf
- https://wiki.archlinux.org/index.php/OfflineIMAP
- http://www.offlineimap.org/doc/use_cases.html
- https://sparkslinux.wordpress.com/2014/01/30/configuring-offlineimap-to-validate-ssltls-certificates/
- http://stevelosh.com/blog/2012/10/the-homely-mutt/#why-local-email
- https://raisedfist.net/2017-05-02/muttupdated/
- https://stackoverflow.com/questions/18765928/mutt-send-signature-hook
- https://notmuchmail.org/vimtips/
- https://www.neomutt.org/guide/configuration.html#my-hdr
- https://www.neomutt.org/guide/advancedusage.html
- https://github.com/neomutt/neomutt/issues/629 - address completion using notmuch
- http://jasonwryan.com/blog/2012/05/12/mutt/
Comments